
Caravan Solar Panel Efficiency: 7 Free Ways to Boost Your Power Before Buying More Panels
After two years of living and travelling in our caravan full-time, I’ve learnt one hard truth about caravan solar panel setups: most of us are wasting the power we already have. We’ve all been there—watching the battery monitor dip lower than expected, Googling “best caravan solar panel upgrade” and reaching for the credit card.
But here’s what took us some time (and a few expensive mistakes) to figure out: before you buy another caravan solar panel, make sure you aren’t wasting the energy you already have.
These seven strategies have genuinely transformed our power situation—and most won’t cost you a cent.
What We Run: A Real-World Off-Grid Case Study
Before diving into the tips, let me give you some context on what we’re actually running. Because your solar needs aren’t really about panel wattage—they’re about what you use and how you use it.
Our Caravan Setup
- 300W of fixed solar panels on the roof
- 160W folding portable panel
- Projecta controller for fixed panels
- Victron MPPT (self-installed) for external panel
- 315Ah of AGM batteries
- Victron SmartShunt (self-installed)
What it runs: Caravan lights, compressor fridge, device charging (phones, tablets, laptops), and Starlink.
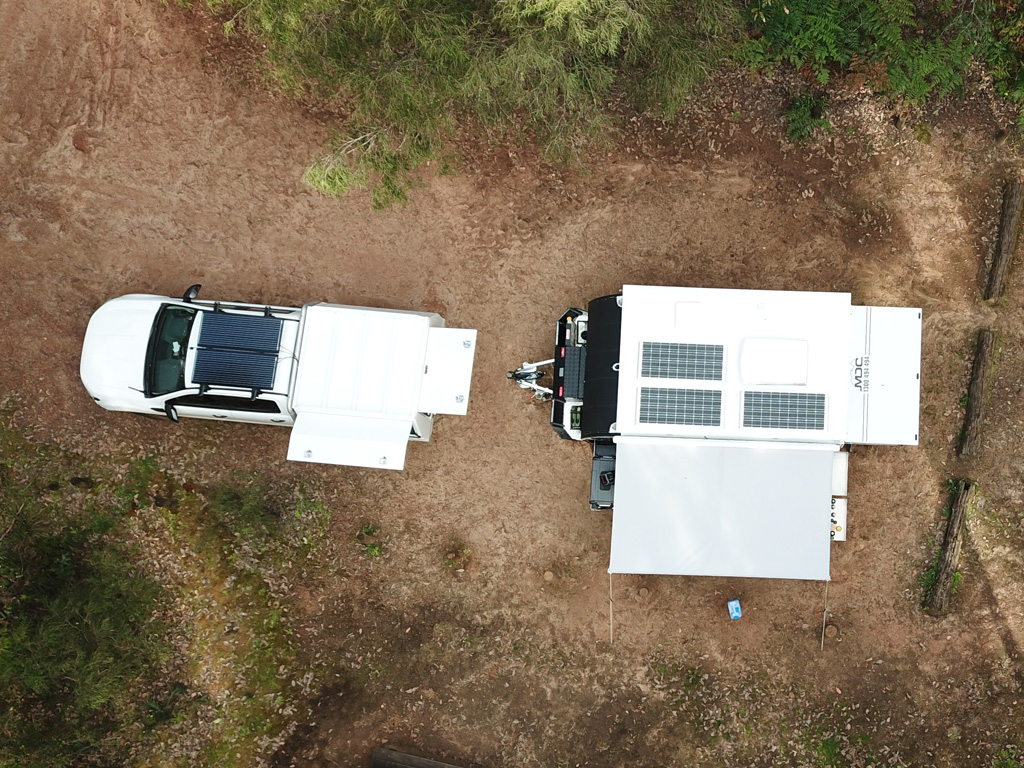
Our Canopy Setup (Ute)
- 240W of fixed solar
- Ability to connect the 160W portable solar panel
- Enerdrive MPPT controller
- 200Ah lithium battery
- Victron SmartShunt
- We designed and installed this system
What it runs: Freezer, rice cooker, coffee machine, device charging and Starlink (we have the ability to run Starlink from both the caravan and the canopy)
The point? We’ve got a decent amount of solar, but it’s our habits that make the real difference between struggling for power and having plenty. Here’s what we’ve learnt.
Our Experience
Other than when our caravan batteries failed, we have not needed to regularly ration our power. Most mornings, the batteries are above 80% and are at 100% by lunch.
Only once in Queensland did we have an issue. We were off-grid near Yeppoon, and it was cloudy, raining and warm for four days. We were still above 50%, but the weather forecast wasn’t looking promising, so we headed to the caravan park.
Rob’s Tip: Keep a simple log of your daily usage for a week. You’ll quickly see what’s actually chewing through your power—and it’s often not what you expect.
Is It Actually Your Batteries, Not Your Panels?
Before you consider ordering a new caravan solar panel, do a quick sanity check: When do your batteries hit full charge?
If your batteries are reaching 100% by mid-morning and your solar is essentially “idling” through the afternoon sun, you don’t have a solar problem—you have a storage problem. All that midday and afternoon energy has nowhere to go.
This is especially common for travellers who have added an extra caravan solar panel but kept their original, smaller battery bank. The maths has shifted; your solar can now harvest more than your batteries can hold.
Keep in mind that adding more batteries or panels solves power issues, but impacts your payload. See our Caravan Towing Weights guide to calculate how much extra capacity your rig actually has
The Fix: The solution isn’t more roof panels. It’s either increasing your battery capacity or shifting your high-drain activities. If you’re going to run a washing machine, charge heavy power tools, or run the coffee machine, do it in the morning or the middle of the day when the sun is at its peak and energy is “free,” rather than drawing from the batteries at night.
Rob’s Tip: If you’ve got a shunt, check what time your batteries typically hit “float” charge. Consistently before 10:00 AM on sunny days? Your battery bank is the bottleneck, not your panels.
Summary Table: Potential Gains
Before we dive into the details, here’s a quick overview of what each strategy can realistically add to your daily harvest:
| Strategy | Potential Gain | Effort Level | Cost |
|---|---|---|---|
| East-West parking orientation | 15-30% | Low | Free |
| Eliminating micro-shade | 20-50% | Low | Free |
| Regular panel cleaning | 2-50% | Low | Free |
| Heat management & ventilation | 10-25% | Low | Free |
| Portable panel angle adjustments | 20-30% | Medium | Free |
| Matching panel voltages correctly | 10-40% (avoids losses) | Medium | Free |
| Installing a battery shunt | Indirect (enables all other gains) | Medium-High | $130-150 |
Note: These gains can compound. A dirty panel in partial shade on a hot day with poor orientation could be producing less than half its potential. Fix all four issues and you might genuinely double your output without spending a cent.
A note for smaller caravans: If you’re travelling in a pop-top, hybrid, or compact caravan, optimising your existing solar is even more critical. Larger vans have plenty of roof real estate to simply bolt on more panels when they need extra power—it’s an easy fix. But when you’ve only got room for one or two panels, you can’t just throw more hardware at the problem. Every watt you squeeze from your existing setup matters. These habits aren’t optional extras for small van owners; they’re essential.
The East-West Rule: Your Biggest Free Power Boost
This single habit has made more difference to our daily harvest than any upgrade we’ve ever bought.
Before you unhook, visualise the sun’s arc. The sun rises in the east, tracks across the northern sky (we’re in Australia, remember), and sets in the west. Your fixed rooftop panels are, well, fixed—so the only control you have is where you park.
The rule: Park your van oriented east-west. This maximises sun exposure throughout the day. If you park north-south, your panels may be in partial shade for a good chunk of the morning or afternoon.
It sounds obvious when you read it, but how many times have you just pulled into a site and hooked up without thinking about it? We’ve done it plenty. Now it’s the first thing we consider.
To state the obvious, you should consider where shade will fall during the day.
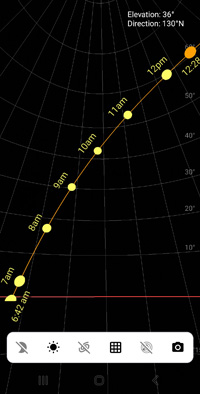
There are apps that let you see how the sun will track throughout the day. We use an Android app called Sun Position: Sunrise & Sunset. As you point your phone at the sky, it will show the Sun’s path in that part of the sky. iPhone users can try Sun Position and Path.
Rob’s Tip: When you arrive at a new camp, spend 30 seconds looking up. Where’s the sun now? Where will it be at midday? Where are the shadows going to fall? This quick mental exercise becomes second nature and genuinely adds hours of productive charging time.
The Micro-Shade Problem: Small Shadows, Massive Impact
Here’s something that absolutely shocked us when we first discovered it: a single tree branch casting a shadow across just one corner of your panel can slash your output dramatically—sometimes by 50% or more.
It’s not proportional. You’d think “5% shade equals 5% power loss,” but solar panels don’t work that way. Most panels are wired in series, which means the shaded cells become a bottleneck for the entire panel. That little branch shadow? It’s acting like a kink in a garden hose.
We call this “invisible shade” because you often don’t notice it from ground level. It’s only when you climb up and have a proper look (or check your controller’s live output) that you realise what’s happening.
If you can measure solar input, try it yourself. Check the input before placing your hand’s shadow on your panel. You may be shocked when you check the input again.
Common Micro-Shade Culprits
- Overhanging tree branches (the most common)
- Your own TV antenna or air conditioning unit
- Power lines
- Neighbouring vans or structures
- Bird droppings (more on cleaning below)
Rob’s Tip: Keep an eye on your controller’s real-time output (or better yet, your shunt—more on that next). When numbers suddenly drop on a sunny day, you’ve got a shade problem—even if you can’t see it from where you’re standing.
If You Want to Spend Money: Install a Shunt
Alright, I know this article is about free power gains—but if there’s one upgrade worth spending money on, it’s a battery shunt. It’s genuinely changed how we manage our power.

What Is a Shunt?
A shunt is essentially a precision current sensor that sits between your battery and your electrical system. It measures every amp going in and out of your battery, giving you accurate data on your state of charge, power consumption, and—crucially for this article—exactly how much your solar is actually producing.
We run Victron SmartShunts in both our caravan (which I installed myself—it’s a very doable DIY job) and our canopy. They connect to the free VictronConnect app via Bluetooth, giving us real-time data on our phones without needing to crawl under the bed to check a monitor.
Why a Shunt Beats Guesswork
Before the shunts, we were flying blind. The battery voltage would tell us roughly where we are, but it is not very accurate, and when charging is active, it does not reflect how full your batteries are (although if you know what to look for, it will tell you if you are at or near full). If you have lithium batteries, you are essentially blind. We’d think we were fine, then suddenly hit the “voltage cliff” and scramble.
Now we can see exactly:
- What’s coming in: Real-time solar input in watts and amps
- What’s going out: What is being used
- True state of charge: Accurate percentage, not voltage guesswork
- Historical data: Trends over days and weeks
This ties directly into everything we’ve talked about. When you park in a new spot and your solar input drops from 15A to 6A, you know something’s wrong—and you can investigate. When you clean your panels and watch the numbers jump, you’ve got proof it was worth the effort.
The DIY Factor
I won’t lie—installing a shunt requires some basic 12V knowledge and comfort working with batteries. But it’s far simpler than many electrical upgrades. The Victron SmartShunt, for example, is essentially three connections: battery negative, load negative, and a temperature sensor if you want one.
If you’re not confident with electrics, any auto electrician can knock it over in an hour or two. It’s a one-time install that pays dividends every single day you’re on the road.
The trick to know about when installing a shunt is that every negative wire must go to the terminal on the shunt that does not go to the battery. The only negative on the battery is from the shunt.
Rob’s Tip: Once you’ve got a shunt installed, spend a week just watching the numbers. You’ll learn more about your system’s behaviour in those seven days than you did in the previous seven months. Patterns emerge—like which appliances are secretly power-hungry, or how much you actually gain from angling that portable panel.
Maintenance as Power: The 5-Minute Habit That Pays Off
When’s the last time you cleaned your caravan solar panel? If you’re like most of us, probably not recently enough.
Road grime, dust, bird droppings, pollen—it all accumulates. And just like micro-shade, it doesn’t take much to impact your output. Studies have shown that dirty panels can lose efficiency by 2% to 50%, depending on conditions. Although I will admit having a 50% power reduction would take a seriously thick layer of dust and bird droppings.
We’ve made it part of our routine: every time we unlatch the roof to be raised, we check the solar panels’ dirt load. When needed, they get a cleaning.
Simple Cleaning Checklist
- ☐ Use plain water (avoid harsh chemicals that can damage coatings)
- ☐ Soft cloth or sponge—never abrasive materials
- ☐ Clean in the morning or evening when panels are cool
- ☐ Pay special attention to bird droppings—they’re the worst offenders
- ☐ Check connection points for corrosion while you’re up there
Rob’s Tip: Keep a dedicated microfibre cloth in your van’s toolbox just for panels. It becomes part of your setup routine, like connecting the water or levelling the van.
The Heat Factor: Why Hot Panels Are Lazy Panels
Here’s one that surprises a lot of people: solar panels actually become less efficient as they get hotter. On a scorching outback afternoon, your panels can lose 10-25% of their rated output purely due to heat.
The technical term is the “temperature coefficient,” but you don’t need to understand the physics to work with it. What matters is this: airflow under your panels is your friend.
Rather surprisingly, our caravan solar panels performed best in Tasmania. It seems counter-intuitive as the sun is at a lower angle. I put it down to lower temperatures.
One time, on a hot day, I moved our external panel to align it with the sun. I almost burnt my hand. It got me wondering. I checked its output, then slowly poured water over it to cool it down. The output went from 8A to 10A before slowly decreasing again as the panel heated up.
For Fixed Rooftop Panels
Make sure there’s adequate clearance between the panel and your roof. Panels mounted flush with the roof will run significantly hotter than those with a gap allowing air to circulate underneath (this is the reason we have avoided using flat panels). If your panels are flush-mounted, there’s not much you can do now, but keep it in mind if you ever upgrade or replace.
For Portable Panels
You’ve got more control here. Never lay your portable panel flat on concrete, bitumen, or dark surfaces—the reflected heat will cook it from below. Use the legs or stand to keep it elevated, allowing air to flow underneath. On really hot days, even positioning it on grass rather than bare ground makes a measurable difference.
Rob’s Tip On extreme heat days (35°C+), your panels will often produce more power in the morning and late afternoon than at midday—even though the sun is strongest at noon. Factor this into your high-drain activities like running the coffee machine.
Portable Panel Optimisation: Work the Angles
If you’ve got a portable panel (and we highly recommend them as a complement to fixed panels), you’ve got a huge advantage: you can chase the sun.
Our 160W folding panel is one of the most versatile bits of kit we own. Unlike our fixed roof panels, we can position it in full sun even when the van is parked in shade. We can angle it perpendicular to the sun. We can move it throughout the day.
Tips for Maximum Portable Panel Output
- Morning: Face east at a steep angle (around 60°)
- Midday: Face north at a shallower angle (30-45° in most of Australia)
- Afternoon: Face west at a steep angle (around 60°)
- All day: Perpendicular to the sun = maximum power
If you are leaving your site for the day, angle the panel for maximum yield.
Yes, it’s a bit of effort. We don’t obsess over it, but making two or three adjustments throughout the day can genuinely add 20-30% to your daily harvest from that panel.
Rob’s Tip: Use the panel’s shadow to help you orient it. For instance since we have a folding panel I move it so that the sun goes through the gap. Quick, easy, no apps required.
The Technical Trap: Why Mixing Panels Can Cost You Power
Right, this one’s important, and it’s where a lot of people go wrong.
If you’re thinking about adding an external portable panel to your existing rooftop system, you need to understand one critical rule: voltages must match when connecting panels to the same controller.
A Quick Note on Voltages
Before we go further, it’s worth clarifying: caravan solar panel voltage and battery voltage are completely different things. Your 12V battery system doesn’t mean your panels run at 12V. Most “12V compatible” solar panels actually operate at 18-22V (their maximum power voltage, or Vmp). This higher voltage is necessary for the charge controller to effectively push current into your batteries.
When you connect panels in parallel (positive to positive, negative to negative), the voltage stays the same but the current adds up. Sounds simple, but here’s the catch: if one panel has a lower voltage than the others, it drags the whole system down to its level. Your fancy high-voltage panel will only produce what your weakest panel can match.
⚠️ Warning: If you plug a 20V portable panel into a system where your fixed panels are running at 40V, you won’t get the combined output you’re expecting. The system will drop to the lower voltage, dramatically reducing what your fixed panels can contribute. You could actually end up with less total charging than if you’d left the portable disconnected.
How to Find Your Panel Voltages
You need to know the Vmp (Voltage at Maximum Power) for each panel you want to connect:
- Fixed rooftop panels: Check the installation manual or paperwork that came with your van. If you’ve lost it, the panel manufacturer and model number should be printed on a label somewhere on the panel itself—search online for the specs.
- Portable panels: Look on the back of the panel. There should be a specifications sticker listing Vmp, Imp (current), and wattage.
- If you’re comfortable with a multimeter: You can measure the open circuit voltage (Voc) directly from the panel in full sun. Vmp will be roughly 80-85% of this reading.
This is exactly why we run separate controllers for our fixed and portable panels. Our Projecta handles the 300W fixed array on the caravan, while the Victron MPPT (which we self-installed) manages our 160W portable independently. Neither system limits the other.
Before Mixing Panels, Check
- Voltage ratings (Vmp) of all panels—they should be identical or very close
- Your controller’s maximum input voltage and current ratings (if the controller is already at its maximum input there is no benefit connecting more panels)
- Whether your controller is MPPT or PWM (MPPT handles mismatches better, but it’s still not ideal)
- If in doubt, use a separate controller for external panels
Rob’s Tip: If you’re buying a portable panel specifically to supplement your existing system, try to match the brand and specs of your rooftop panels. Alternatively, budget for a second controller—it’s worth the investment for optimal performance.
The Bottom Line: Try These Tips Before You Buy
Look, we’re not saying you’ll never need another caravan solar panel. If your power demands genuinely exceed your system’s capacity, more panels might be the answer. But after years on the road, we’ve met countless travellers who’ve thrown money at new gear when the real problem was their habits (this also goes for car upgrades, but that is a different story).
Here’s our challenge to you: On your next trip, commit to implementing just three of these strategies consistently. Park with intention. Check for shade. Keep your panels clean. Angle your portables. Note your results.
We reckon you’ll be surprised. That extra panel you were about to order? It might just end up staying in the shop.
Quick Reference: Daily Solar Habits Checklist
- ☐ Visualise the sun’s arc before choosing your parking spot
- ☐ Orient the van east-west with panels facing north
- ☐ Check for overhanging branches and micro-shade
- ☐ Give panels a quick clean during setup
- ☐ Ensure airflow under fixed and portable panels
- ☐ Adjust portable panels 2-3 times throughout the day
- ☐ Monitor your controller’s output to catch problems early
Did You Know that Clouds May Increase Caravan Solar Panel Output?
OK, this is a bit outside the scope of this article, but I thought I would share it with the fellow geeks out there: Do you know that clouds can increase your solar panel’s output?
It seems a bit odd, but it can occur through an effect called the edge-of-cloud effect. It occurs on partly cloudy days. Light is scattered by white clouds that then falls on your panel in addition to the direct sunlight.
The effect causes a brief increase in solar output. This may result in the panel producing more power than it is rated for. We have seen our 160W panel briefly produce 170W.
For more useful information that may make life easier, see our Caravan Guides page.
Safe travels and sunny skies.


